Last Updated: November 1, 2026
Quick Summary
The best way to maximize small kitchen storage is to declutter first, then organize by activity zones and use vertical space and adjustable shelving. Start by keeping only what you actually use, group items by task near where that task happens, and add inserts, risers, and wall storage that match your cabinet dimensions.
- Remove items you haven’t used in the last three months before adding any organizers.
- Adjust upper cabinet shelves to fit short and tall items, often recovering a full shelf per cabinet.
- Keep frequently used items between about 24 and 60 inches off the floor for easy reach.
- Measure interior cabinet width and depth at front and back, since older kitchens are rarely square.
- Use tension rods, adhesive hooks, and over-the-door racks if you rent and cannot drill.
Table of Contents
- Start by Decluttering and Prioritizing What You Keep
- How to Organize a Small Kitchen by Zone
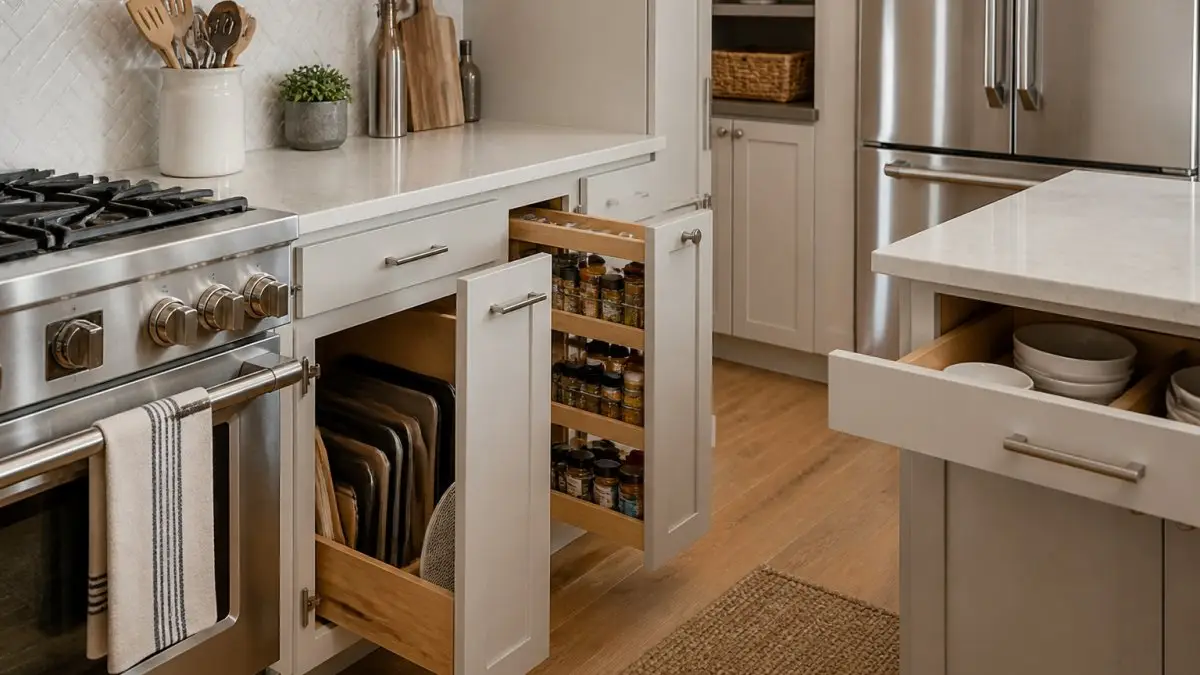
- Small Kitchen Storage Ideas for Cabinets and Drawers
- Vertical Storage Ideas for Small Kitchens
- Small Kitchen Pantry Ideas That Use Every Shelf
- Budget, Renter-Friendly, and Custom Options Compared
- Book a Custom Storage Plan for Your Kitchen
- Frequently Asked Questions
Small kitchens fill up fast. A few cabinets, one drawer that never closes, and a counter that collects everything from mail to mixing bowls. Most people don’t need a bigger kitchen to fix this. They need better small kitchen storage. Across many kitchens, the same pattern shows up again and again: a little planning beats a lot of stuff.
Here is a practical seven-step approach to get more use out of every inch.
Start by Decluttering and Prioritizing What You Keep
Before you add a single organizer, take everything out. Empty the cabinets, drawers, and pantry, and sort items into three piles: keep, donate, and toss.
Be honest about what you actually use. A good test is to ask whether you used an item in the last three months. If not, it likely doesn’t need prime space.
- Keep daily-use items within easy reach
- Store seasonal or rarely used gear on high or low shelves
- Donate duplicate gadgets and mismatched containers
- Toss expired spices and broken utensils
Once the room holds only what you need, every storage decision gets easier.
How to Organize a Small Kitchen by Zone
Organize by activity, not by item type. Group everything used for one task in one spot. This is the fastest way to cut wasted steps and clutter.
Common kitchen zones include:
- Prep zone: cutting boards, knives, mixing bowls, and measuring tools near the counter where you chop
- Cooking zone: pots, pans, oils, and spices near the stove
- Cleaning zone: dish soap, sponges, and towels near the sink
- Pantry zone: dry goods and canned items in one area, easy to scan
Place each zone close to where the work happens. A coffee station next to the outlet, for example, saves you from hunting for mugs across the room.
Small Kitchen Storage Ideas for Cabinets and Drawers
Cabinets and drawers hold most of a kitchen’s gear, so small changes here pay off fastest. The trick is to match the fix to your cabinet’s actual dimensions and door style rather than buying a generic set.
Measure before you buy. Standard base cabinets are 24 inches deep, but the usable depth behind the door is usually 22 to 23 inches once you account for the frame and hinges. Standard upper cabinets are 12 inches deep. A 15-inch-deep base cabinet with a single door has far less usable volume than a 24-inch-deep cabinet with drawers, so the same insert won’t work in both. Measure interior width, depth, and height at the front and back of each cabinet, older kitchens are rarely square.
Drawer inserts and dividers. A 3-inch-deep cutlery tray fits most standard 21-inch-wide drawers; adjustable dividers work better in wider drawers because you can resize the compartments as your utensils change. For deep drawers (8 to 10 inches), a two-tier insert doubles usable space without blocking the lower level. Bamboo and coated wire are the common materials; wire lets dust fall through, bamboo is quieter and kinder to knives.
Base cabinet pull-outs. A roll-out tray typically needs 1 to 2 inches of clearance on each side of the opening and a minimum 12-inch interior width to be useful. Full-extension slides (as opposed to three-quarter extension) let you reach the back 6 inches of a 24-inch cabinet, which is where most small kitchens lose usable space.
Lazy Susans and corner cabinets. A 28-inch pie-cut lazy Susan fits most corner base cabinets; a half-moon two-tier unit adds a second level without blocking the door swing.
Upper cabinet adjustments. Adjustable shelves are the single highest-return change in upper cabinets. Most cabinets ship with shelves fixed at 10 to 12 inches apart, which wastes 4 to 6 inches above short items like cans and spice jars. Moving a shelf down to 7 inches for cans and up to 14 inches for cereal boxes typically recovers one full shelf’s worth of space per cabinet. Add a shelf riser (usually 10 to 12 inches wide) to create a second tier for mugs or spices without drilling.
Under-sink cabinets. The drain and disposal eat the center, so use two narrow pull-outs on either side (typically 8 to 10 inches wide) and a low-profile bin in front of the drain. A tension rod across the opening holds spray bottles by their triggers and keeps them off the cabinet floor.
Renter vs. owner trade-offs. Tension rods, adhesive-backed dividers, and freestanding shelf risers require no drilling and remove cleanly. Pull-out trays and corner organizers usually need screws into the cabinet floor or side, so they are better suited to owners or long-term renters with permission. If you rent, start with inserts and risers; if you own, pull-outs and adjustable shelving deliver more usable inches per dollar.
Measure the interior width at the front and back of each cabinet. A 1/2-inch difference is common in older homes and will bind a pull-out that looked like a perfect fit on paper.
Custom cabinetry can take this further, with interiors planned around the items you actually own.
Vertical Storage Ideas for Small Kitchens
Walls are the most underused space in a small kitchen, but vertical storage only works if it is safe, reachable, and appropriate for your wall type. The right system depends on whether you can drill, how much weight the wall holds, and how tall the people using the kitchen are.

Know your safe reach zone. A common ergonomic guideline is to keep frequently used items between shoulder height and knee height, roughly 24 to 60 inches off the floor for most adults. Items above 60 inches should be light (paper goods, rarely used platters) and items below 24 inches should be heavy (pots, appliances). A wall rack mounted at 48 to 54 inches keeps daily tools in the easy-reach band without blocking the counter.
Weight limits matter. A magnetic knife strip typically holds 5 to 10 pounds depending on magnet strength and wall anchoring. A rail system with hooks can hold 20 to 40 pounds if anchored into studs; into drywall alone, plan on 10 pounds or less. Open floating shelves rated for 25 to 50 pounds need stud anchoring or heavy-duty toggle bolts, a shelf loaded with cast iron will pull out of drywall. Always check the manufacturer’s weight rating and anchor accordingly.
No-drill options for renters. Tension rods (typically 12 to 36 inches) work inside upper cabinets and under the sink for hanging spray bottles and cleaning tools. Adhesive hooks rated for 5 to 10 pounds hold utensils, small cutting boards, and towels; they fail on textured or greasy walls, so clean with rubbing alcohol first. Over-the-door racks fit standard 24-inch cabinet doors and add a shelf or two without a single hole. Freestanding leaning shelves (usually 12 to 18 inches wide) add vertical storage without wall attachment.
Wall-mounted options for owners. A magnetic strip for knives and metal tools keeps the most-used items visible and off the counter. A rail system with hooks handles pots, pan lids, and utensils; mount it 18 to 24 inches above the counter so lids clear the backsplash. Floating shelves work best for cookbooks and frequently used dishes, but keep them at or below eye level so you can see what’s on them. A pegboard (typically 1/4-inch holes on 1-inch centers) is the most flexible system for odd-shaped tools and can be reconfigured as your needs change.
Sides of cabinets and the refrigerator. The 6- to 12-inch gap beside the refrigerator or between the cabinet and wall is prime real estate. A slim rolling cart (6 to 9 inches wide) fits there and holds cans, cleaning supplies, or cutting boards. Magnetic spice racks attach to the side of the refrigerator and hold 12 to 18 jars without drilling. A tension rod between two cabinets can hang cleaning tools out of the way.
Layout-specific notes. In a galley kitchen, use one wall for cooking tools and the other for prep and cleaning so you never cross the aisle unnecessarily. In an L-shaped kitchen, the corner above the counter is often dead space, a corner shelf or a two-tier riser recovers it. In a single-wall kitchen, vertical storage is the only expansion available, so prioritize the wall above the counter and the sides of the refrigerator.
Never mount heavy items (cast iron, stand mixers, large appliances) on drywall alone. Use studs or heavy-duty toggle bolts, and keep the total load under the hardware’s rated capacity.
Keep wall storage to items you use often. Anything tucked up high should be light and easy to lift down, and anything within a child’s reach should be safe or locked.
Small Kitchen Pantry Ideas That Use Every Shelf
A pantry doesn’t need to be large to work well. Store like items together, use clear labeled bins, and place frequently used foods at eye level.
Adjustable shelving lets you size each shelf to the item. A tall shelf for cereal boxes and a short one for spice jars wastes far less space than fixed shelving. Door-mounted racks add room for spices and small packets without taking up a shelf.
Rotate older items to the front each time you restock. This simple habit prevents expired food from getting pushed to the back and forgotten.
Budget, Renter-Friendly, and Custom Options Compared
Storage upgrades come in a range of costs and commitments, so match the option to your situation:
| Option | Best For | Commitment |
|---|---|---|
| Bins, racks, and hooks | Renters, tight budgets | Low, no installation |
| Drawer inserts and dividers | Existing cabinets, quick fixes | Low to moderate |
| Custom built-ins | Long-term homeowners, unusual layouts | Higher, professionally built |
Renter-friendly options like freestanding racks, tension rods, and adhesive hooks avoid drilling into walls. Homeowners can go further with permanent changes. For a custom storage plan, Saugahatchee Woodworks builds cabinetry and built-ins designed around the dimensions of your kitchen. Pricing depends on the scope of the project, so visit our website for current details or to request a quote.
Book a Custom Storage Plan for Your Kitchen
Small kitchens respond well to planning, and the right built-in can change how the whole room works. You can see how custom cabinets are fitted to a specific space in Auburn and Opelika before you decide. If you’re ready to move past piecemeal fixes, Saugahatchee Woodworks can design storage around your space, your cooking habits, and the way you actually use the room. Request an estimate to start the conversation.
Frequently Asked Questions
How can I maximize storage in a small kitchen?
Start by removing items you do not use, then group what remains by zone such as cooking, prep, and cleanup. Use vertical wall space for knives, spices, and pans, and add drawer dividers so every drawer has a purpose. Custom cabinetry built to your exact dimensions can help use space that standard cabinet sizes leave unused. Pricing depends on materials, dimensions, and scope, so request a quote from Saugahatchee Woodworks for an accurate estimate.
What is the best way to organize a small kitchen?
Organize by frequency of use. Keep daily items such as coffee supplies, cooking oils, and everyday dishes within arm’s reach of where you use them. Store occasional items like specialty appliances on higher shelves or in pantry storage. Labeled bins and shallow drawer inserts keep small items from getting lost. Reassess every few months so the system stays practical as your habits change.
How do you add storage to a kitchen with limited cabinet space?
Look first at unused areas: the inside of cabinet doors, the space under the sink, the gap beside the refrigerator, and the back of pantry doors. Mounted racks, pull-out organizers, and door-mounted spice racks add capacity without changing the layout. For a permanent gain, custom built-in storage can increase usable space.
How can custom cabinets improve storage in a small kitchen?
Custom cabinets are built to the exact dimensions of your room. Drawer layouts can be designed around the items you own. Saugahatchee Woodworks designs custom cabinetry around the room, the homeowner, and how the space will be used. Contact the team to discuss your layout.



Leave a Reply